
Do you use your terminal a lot? I bet you would want to add some text to look at each time you launch your terminal. In this article, you would create a custom message on your terminal using Figlet.
Prerequisite
If you are running on a macOS and don't have Homebrew installed, you need to install CLI tools for Xcode and Homebrew. If you are running on a different operating system, skip Step 1.
Step 1: Install Homebrew
Homebrew is a free and open-source software package management system that simplifies the installation of software on Apple’s macOS.
Before installing Homebrew, you need to install the CLI tools for Xcode. Open your terminal and run the command:
xcode-select —-installIf you get an error, run xcode-select -r to reset xcode-select.
Then, install Homebrew.
/usr/bin/ruby -e "$(curl -fsSL https://raw.githubusercontent.com/Homebrew/install/master/install)"Step 2: Install Figlet
Figlet is a command-line utility that generates text banners in a variety of typefaces, composed of letters made up of conglomerations of smaller ASCII characters.
brew install figlet   # macOS
apt install figlet    # Debian/Ubuntu
yum install figlet    # CentOS/RHEL
dnf install figlet    # Fedora 22+
Once you have installed figlet, you can view all the fonts in the terminal by running the command:
showfigfontsTo view how your message would be displayed using different fonts, type showfigfonts on your terminal, followed by your message. In this scenario, I'll be using { } is poetry
showfigfonts "{ } is poetry"The basic way of using figlet is by providing the text that you want to transform as an argument.
figlet '{ } is poetry'To check the manual, run man figlet.
You can specify your desired font, using the -f flag.
figlet -f weird '{ } is poetry'For a clearer output, you can use the -k flag to add a little space between the printed characters. This is evident when you use a compact font. Try running the two commands below and notice the difference.
figlet -f small '{ } is poetry'

figlet -k -f small '{ } is poetry'
Use the -c flag to centralize your text and the -r to display the text at the right.
Step 3: Add Colors
To go a bit further with the customization, add colors to the text. The -e option of the echo command is used for parsing of the escape sequences.
echo -e "\e[32mDon’t let the noise of others’ opinions drown your own inner voice\e[0m"To use the colors alongside figlet, run
echo "\e[32m"                    # Invoke a color
figlet -f slant "{ } is poetry"  # Use a slant font
echo "\e[0m"                     # Reset the color
The “\e[32m” sequence adds a green color to the terminal. The colors are derived from the ANSI escape code.
The “\e[0m” sequence resets the terminal. It removes all attributes (formatting and colors). Always add it at the end of each colored text.
You can combine attributes but ensure that the attributes are separated by a semicolon. To create a bold and underlined text, use \e[1;4;33m.
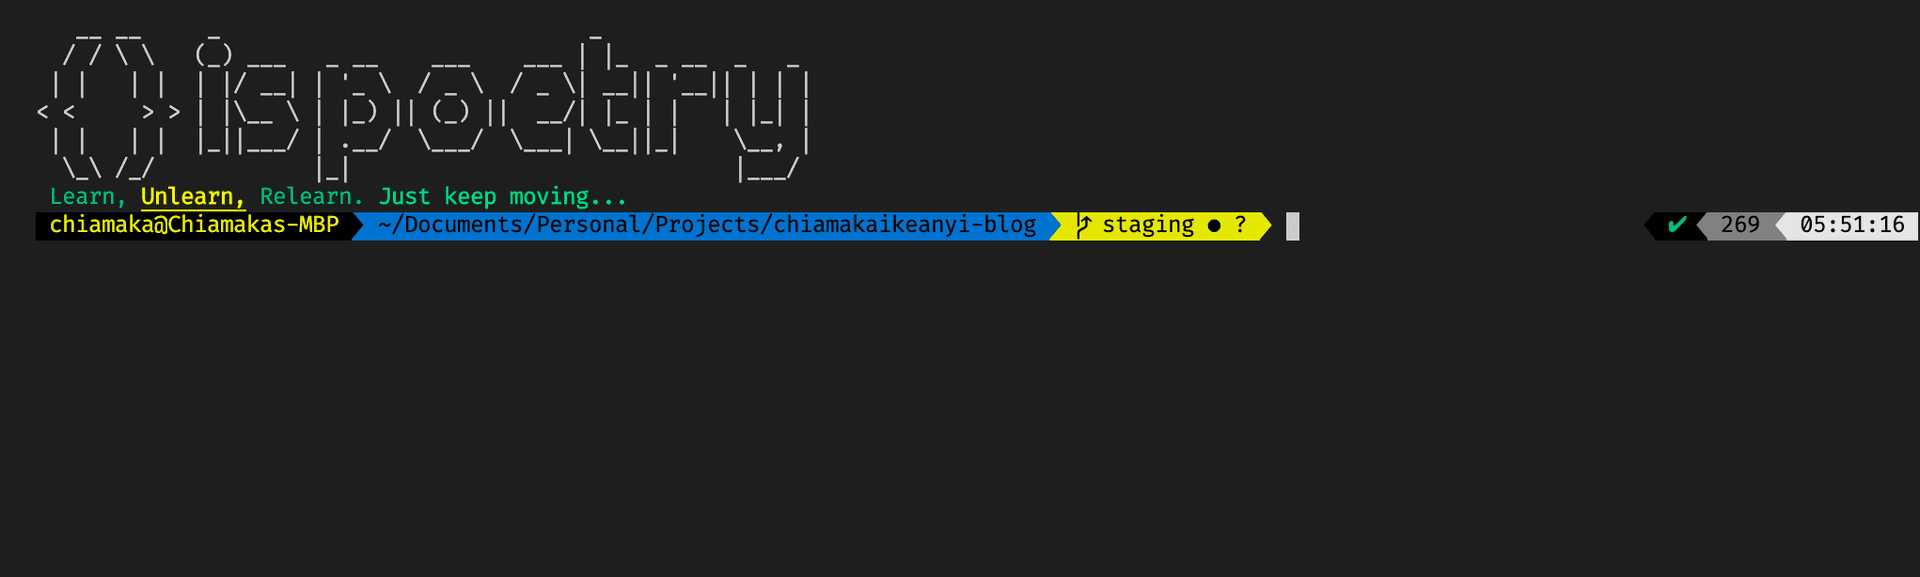
echo -e "Learn, \e[1;4;33mUnlearn\e[0m, Relearn. \e[1mJust keep moving...\e[0m"You're done with the bits. Now, add everything together to create an awesome terminal.
The customizations you've done so far disappears when you quit the terminal. To make it persist, copy the code and paste in your .zshrc or .bash_profile. I'll use the zshrc file. Feel free to use bash_profile file.
Run the command below on your terminal to open the file with your Visual Studio Code editor.
code ~/.zshrcIf you cannot access files using VS Code code command, you need to install it.
-
Launch VS Code
-
Press CMD + SHIFT + P
-
Type shell command
-
Select Install code command in path.
You can also launch it with nano using,
nano ~/.zshrcPaste the code below or your custom message in the .zshrc or .bash_profile file.
figlet -k '{ } is poetry'
echo -e "\e[32m Learn, \e[1;4;33mUnlearn,\e[0m \e[32mRelearn. \e[1mJust keep moving...\e[0m"
Finally, save your changes by running the command:
source ~/.zshrc

or

source ~/.bash_profile
Voila! you now have an awesome terminal and have gotten a sneak peek of how my terminal currently looks.
Read my article on How to configure your terminal with ZSH for a deep dive into customizing your terminal.