
I wrote an article for LogRocket on Deep Dive into Event Bubbling and Capturing. In the article, I explained how event bubbling and capturing works with a practical example.
Read the article on LogRocket blog or continue below.
If an element and its parent have an event handler for the same event, which element would fire first when triggered?
Propagating events in JavaScript using bubbling and capturing provides developers with an answer to this question. In this article, you'll learn how event bubbling and capturing work, compare different methods for accessing event properties, and run through a few different examples and use cases.
Let’s get started!
What is event capturing?
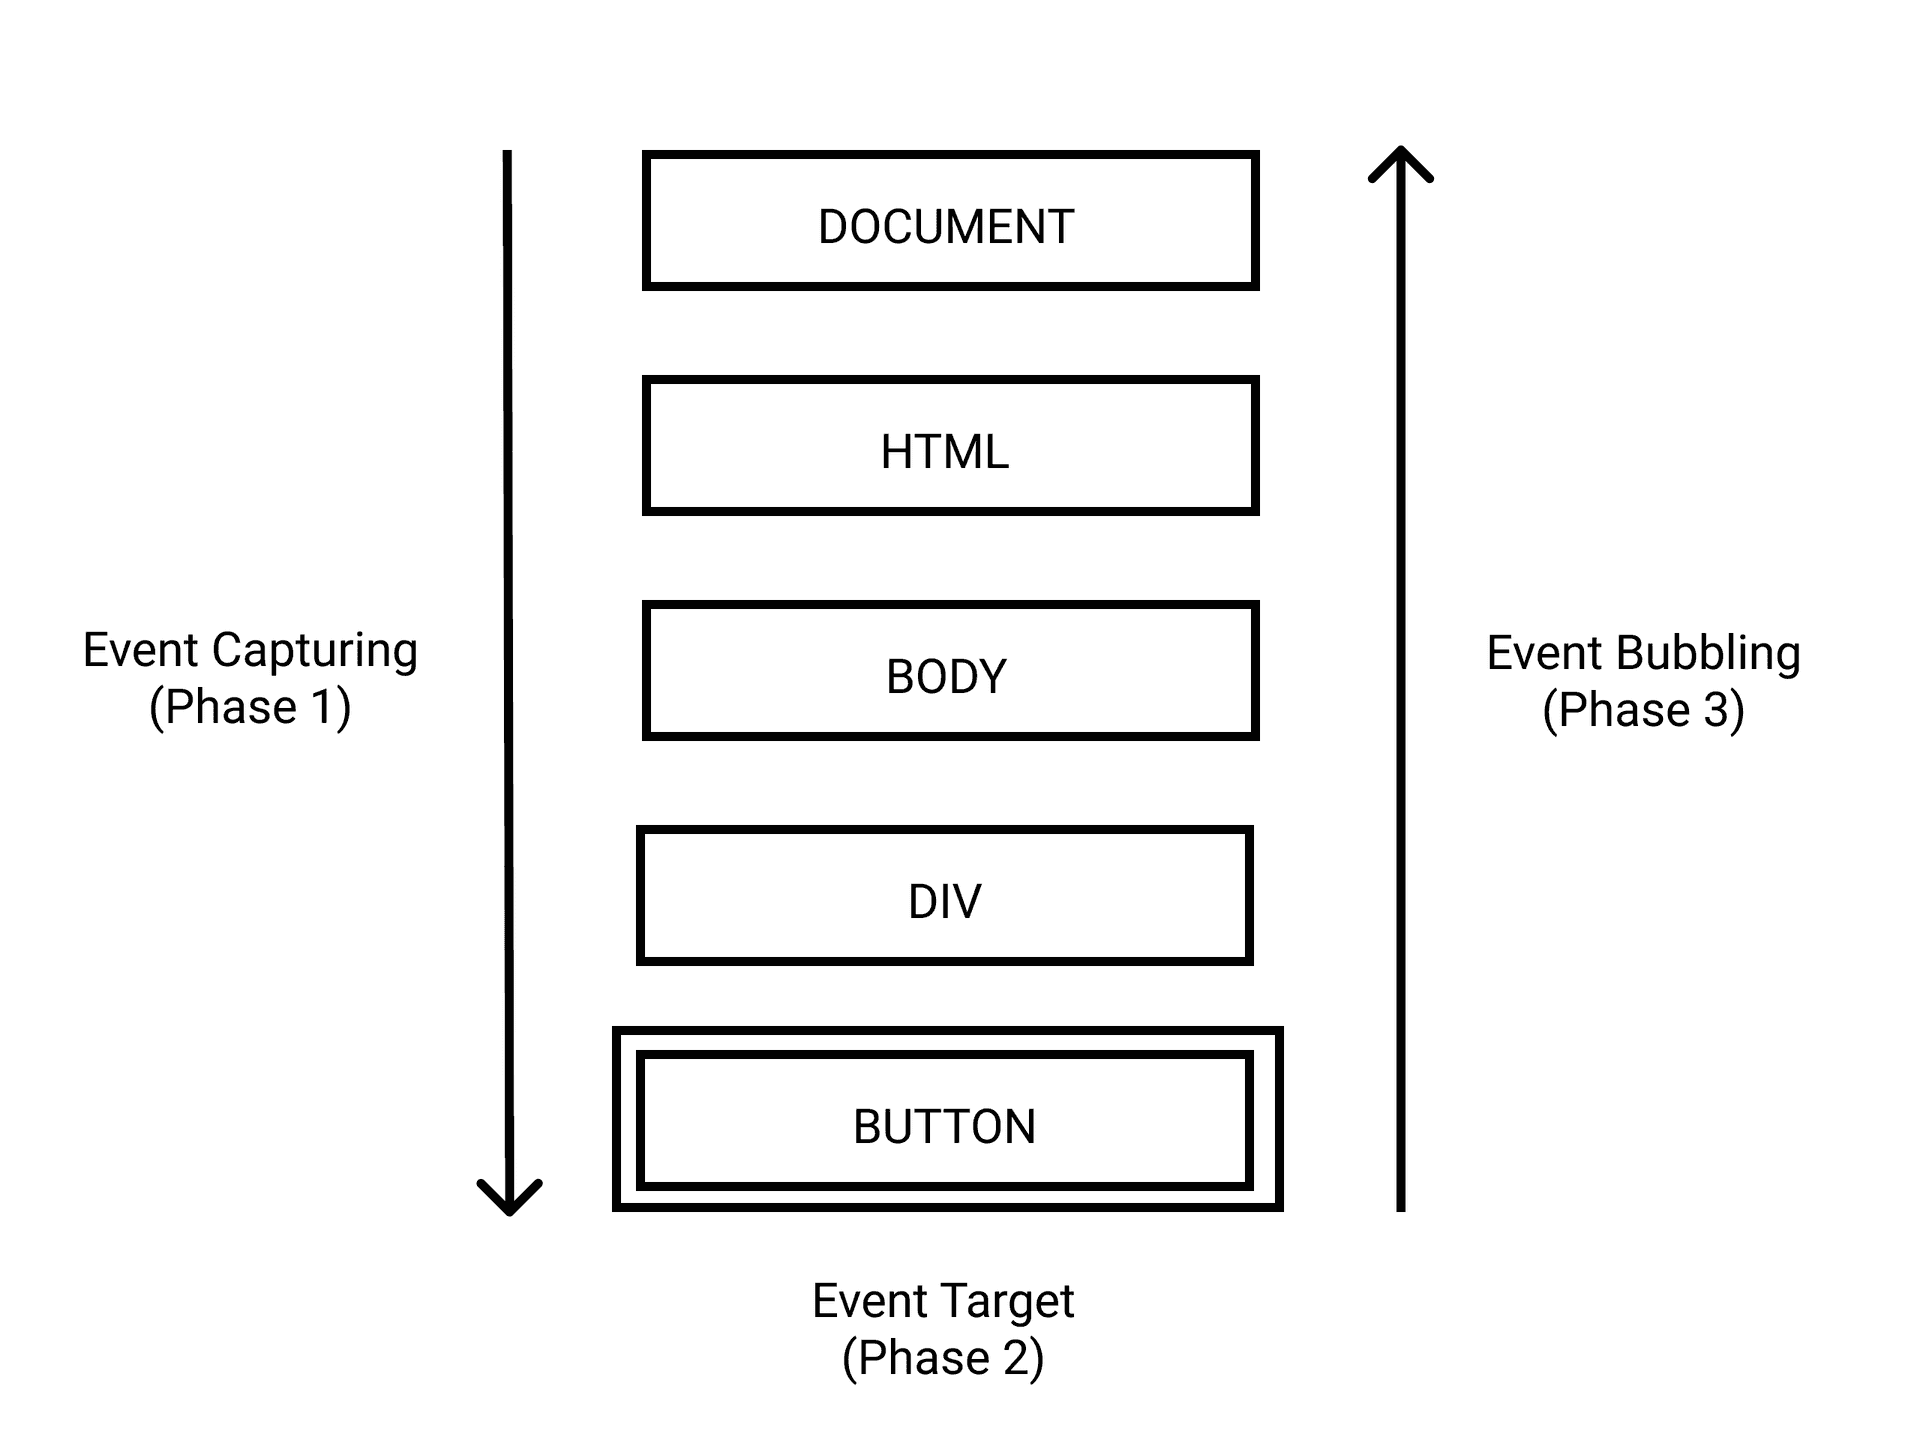
In event capturing, which is also known as trickling, the outer event handler fires before the specific handler fires. For example, the event on the div shown on the image triggers before the event on the button:
Capturing has a higher priority than bubbling, meaning that capturing event handlers are executed before bubbling event handlers, as shown by the phases of event propagation:
- Capturing phase : the event moves down towards the element
- Target phase: the event reaches the target element
- Bubbling phase: the event bubbles up from the element
What is event bubbling?
Event bubbling follows the opposite order as event capturing. An event propagates from a child HTML element, then moves up the DOM hierarchy to its parent elements:
Listening to propagation events
We can listen to these propagation events using the addEventListener() method, which is appended to HTML nodes. It accepts three arguments: an event name, a callback function, and an optional capture value, which is set to false by default:
element.addEventListener(event, handler, false);Capture value is empty
Let’s review what will happen if a user clicks on the button when the capturing value is left blank:
element.addEventListener(event, handler);The click event begins in the capturing phase. It searches the parent elements of the target for any element with the event handler. It will not find any event handler for the capturing phase.
Next, it trickles down to the target. Once all events for the phase are executed, the event moves to its bubbling phase. It executes any event handler set on the target element. It propagates up again, searching through the target’s parent elements for any event handler for the bubbling phase. Now, the event cycle is complete.
Capture value is true
Let’s consider what happens if the capturing value is set to true:
element.addEventListener(event, handler, true);The code snippet above will follow the same order as when the value was empty. The key difference is that the event handler will execute any event handler it finds before trickling down to the target.
Accessing event object properties
There are differences in the methods used by handlers to access event object properties:
event.target: refers to the DOM element that triggered the eventevent.eventPhase: returns the current phase of event propagation (capturing: 1, target: 2, bubbling: 3)event.currentTarget: refers to the DOM element that handles the event. It is usually accessed with the this keyword.
Note that if an event listener is attached to the parent, but event propagation is stopped by the child, event.currentTarget refers to the DOM element that stopped the propagation.
Event bubbling structure
Now that we understand how event bubbling and capturing work, let’s try an example! Let’s say we have the following DOM structure and the following event listener, respectively:
<button class="cta_button">Click me</button>document
.querySelector('.cta_button')
.addEventListener('click', function(event) {
console.info(`${event.type} event fired on ${this.nodeName}`);
});Click event fired on BUTTON would be logged to the console.
Nested DOM structure
Let’s see what happens when the DOM structure is nested and uses the same event listener attached to the parent element:
<div class="cta_container">
<button class="cta_button">Watch me bubble</button>
</div>document
.querySelector('.cta_container')
.addEventListener('click', function(event) {
console.info(`${event.type} event fired on ${this.nodeName}`);
});In the code snippet above, we set a click event listener on the div, the parent element of the button. When clicked, it logs the type of event fired and the element it is fired on.
When users click the Watch me bubble button, the event is directed to the button. If an event handler is set for the button, the event is triggered. Otherwise, the event bubbles, or propagates, to the parent div, and a click event is fired on the parent. If the event is not handled, the process continues to the next parent at the outer bound until it eventually reaches the document object.
Even though you clicked on the button, the information logged to the console is Click event fired on DIV.
Attach event listener to button
What happens when we also attach an event listener to the button?
<div class="cta_container">
<button class="cta_button">Watch me bubble</button>
</div>document
.querySelector('.cta_container')
.addEventListener('click', function(event) {
console.info(`${event.type} event fired on ${this.nodeName}`);
});
document
  .querySelector('.cta_button')
  .addEventListener('click', function(event) {
    console.info(`${event.type} event fired on ${this.nodeName}`);
});The output becomes Click event fired on BUTTON and Click event fired on DIV.
As you can see, the event bubbled to the parent. You can use the event.bubbles property to ascertain whether an event bubbles:
document
.querySelector('.cta_button')
.addEventListener('click', function(event) {
console.info(
`${event.type} event fired on ${this.nodeName}. Does it bubble? ${event.bubbles}`
);
});Stopping the propagation
An event on a DOM element propagates to all of its parent elements unless it is stopped. Although there is usually no need to prevent bubbling, it can be useful in certain cases. For example, stopping the propagation can prevent event handlers from interfering with each other.
Consider handling drag-and-drop using mousemove and mouseup events. Stopping the propagation may prevent browser bugs that arise as a result of users randomly moving the mouse.
Calling event.stopPropagation() on the child element prevents it from bubbling to the parent element:
document.querySelector('.cta_button').addEventListener('click', event => {
event.stopPropagation();
// ...
});Let’s stop the propagation for our example from the previous section where we clicked a button:
<div class="cta_container">
<button class="cta_button">Watch the bubble stop</button>
</div>Let’s add the event listeners:
document
  .querySelector('.cta_container')
  .addEventListener('click', function(event) {
    console.info(`${event.type} event fired on ${this.nodeName}`);
  });
document
.querySelector('.cta_button')
.addEventListener('click', function(event) {
event.stopPropagation();
console.info(`${event.type} event fired on ${this.nodeName}`);
});The event was prevented from bubbling using event.stopPropagation(). The output becomes Click event fired on BUTTON.
Prevent browser default
Let’s say you want to allow the propagation to continue, but you want to prevent the browser from performing its default action if there is no listener handling the event. You can use event.preventDefault():
document.querySelector('.cta_button').addEventListener('click', event => {
  event.preventDefault();
  // ...
});
Event bubbling use case
Let’s apply what we’ve covered and create a shopping list app that strikes an item once you purchase it. In this scenario, adding individual event listeners won’t be feasible because you may decide to add a new item in the future.
Instead, you need to attach the event listener to the parent element of the list. The event listener will handle the click event from the children through event bubbling.
In the code snippet below, we list our shopping items:
<ul class="list">
  <li class="item">MacBook Pro</li>
  <li class="item">Logitech MX Keys</li>
  <li class="item">Sony a6400 camera</li>
  <li class="item">Boya universal cardioid microphone</li>
  <li class="item">Light ring</li>
</ul>
Attached an event listener to <ul>, as seen below:
document.querySelector('.list').addEventListener('click', event => {
  event.target.classList.toggle('purchased');
});
You can view this code on CodePen and open the console to view bubbling in action.
Event capturing structure
During event delegation, where event bubbling is not supported, event capturing becomes especially beneficial for attaching events to dynamic content. For example, you may need to handle events like focus and blur for which bubbling is not supported.
To catch an event on the capturing phase, you need to set the useCapture option to true. Remember, by default, it is set to false:
element.addEventListener(event, handler, true);Let’s consider a nested DOM structure:
<div class="cta_container">
  <button class="cta_button">Watch me capture</button>
</div>
We’ll set the useCapture option of the parent element to true:
document.querySelector('.cta_container').addEventListener(
document.querySelector('.cta_container').addEventListener(
  'click',
  function(event) {
    console.info(`${event.type} event fired on ${this.nodeName}`);
  },
  true
);

document
  .querySelector('.cta_button')
  .addEventListener('click', function(event) {
    console.info(`${event.type} event fired on ${this.nodeName}`);
  });
Contrary to what we get using bubbling, the output is Click event fired on DIV and Click event fired on BUTTON.
Event capturing use case
Let’s continue our example from earlier when we built a shopping list. If you wanted to add an input field to the shopping list that enables you to set a budget for each item, the event listener attached to the parent would not apply to those input fields.
Let’s take the code for our shopping list and an event listener:
<h1 class="title">Shopping List</h1>
<ul class="list">
  <li class="item">
    MacBook Pro
    <input class="budget" type="number" min="1" />
  </li>
  <li class="item">
    Logitech MX Keys
    <input class="budget" type="number" min="1" />
  </li>
  <li class="item">
    Sony a6400 camera
    <input class="budget" type="number" min="1" />
  </li>
  <li class="item">
    Boya universal cardioid microphone
    <input class="budget" type="number" min="1" />
  </li>
  <li class="item">
    Light ring
    <input class="budget" type="number" min="1" />
  </li>
</ul>document.querySelector('.list').addEventListener('focus', function(event) {
console.info(`${event.type} event fired on ${this.nodeName}`);
event.target.style.background = '#eee';
console.log('target:', event.target);
console.log('currentTarget:', event.currentTarget);
console.log('eventPhase:', event.eventPhase);
});When you focus the cursor on any input field, nothing happens. However, when you set the useCapture option to true, you’ll achieve the desired result:
document.querySelector('.list').addEventListener(
  'focus',
  function(event) {
    console.info(`${event.type} event fired on ${this.nodeName}`);
    event.target.style.background = '#eee';

    console.log('target:', event.target);
    console.log('currentTarget:', event.currentTarget);
    console.log('eventPhase:', event.eventPhase);
  },
  true
);
You can view this list on CodePen, and open the console to view capturing in action.
Conclusion
A strong understanding of event bubbling and capturing is essential for handling user events in JavaScript. In this tutorial, we learned how event propagation works in JavaScript, following the sequence of capturing, target phase, and bubbling.
Note that bubbling always propagates from a child element to the parent, while capturing propagates from the parent element to the child. To remember the propagation order, you can think of “bubble up and trickle down”.