
Have you been in a situation where you commit your code and SonarQube adds comments identifying bad coding styles to be resolved? You make the changes and commit again and the issue still persists? This can be frustrating due to the continuous loop you find yourself in a bid to resolve the issue.
In this article, you’ll learn how to set up SonarQube in Visual Studio Code (VS Code) to help combat the write and commit loop.
SonarQube is an open-source platform developed by SonarSource for continuous inspection of code quality to perform automatic reviews with static analysis of code to detect bugs, code smells, and security vulnerabilities on 20+ programming languages. It offers reports on duplicated code, coding standards, unit tests, code coverage, code complexity, comments, bugs, and security vulnerabilities. - Wikipedia
Configuration Steps:
You would install SonarLint extension and bind the extension to your SonarQube server.
Step 1: Install SonarLint
SonarLint is an extension published by SonarSource that helps you detect and fix quality issues as you write code in JavaScript, TypeScript, Python, Java, HTML and PHP.
In this step, you would need to add the extension to your VS Code. To access the extension,
- Go to VS Code View menu › Extensions
- Search for SonarLint in the marketplace
- Click on the extension
- Click on Install
You can also visit the Visual Studio Code marketplace to install SonarLint.
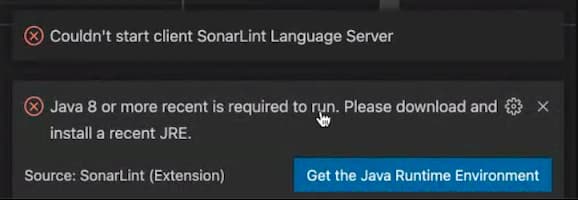
SonarLint requires a JDK to be installed. A notification showing Java 8 or more recent is required to run. Please download and install a recent JRE. displays if you don't have the required JDK installed. Click on Get the Java Runtime Environment to download and install the required JDK.
Step 2: Open VS Code Global Settings
Changes made in this file are global. So, it will affect all your projects accessed with VS Code.
To access the settings.json file,
- Press CTRL + SHIFT + P or Command + SHIFT + P
- Type Open Settings and choose Preferences: Open Settings (JSON)
You can also use the steps below if you have some settings already configured:
- Click on the gear icon usually at the bottom-left corner of VS Code by default
- Click on the settings option to access the user settings
- Expand the Extensions category and navigate to the SonarLint section
- Under Sonarlint › Connected Mode › Connections: SonarQube, click on Edit in settings.json. This pre-populates the settings file with the key and an empty array as shown below:
"sonarlint.connectedMode.connections.sonarqube": [

  ]
Step 3: Add SonarQube configuration
Add your server URL and token to settings.json
Example:
"sonarlint.connectedMode.connections.sonarqube": [
  {
    "serverUrl": "https://sonar.domain.com",
    "token": "V2VkIE1..."
  }
]
Step 4: Generate SonarQube User Token
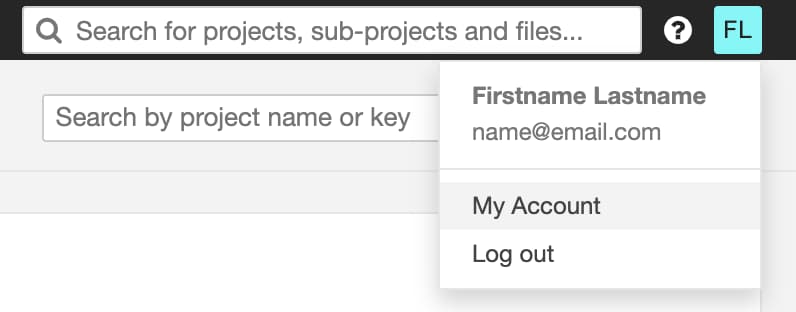
Access your SonarQube server e.g. https://sonar.domain.com and log in with your credentials. Then, navigate to your Account settings at the top-right corner of the web page.
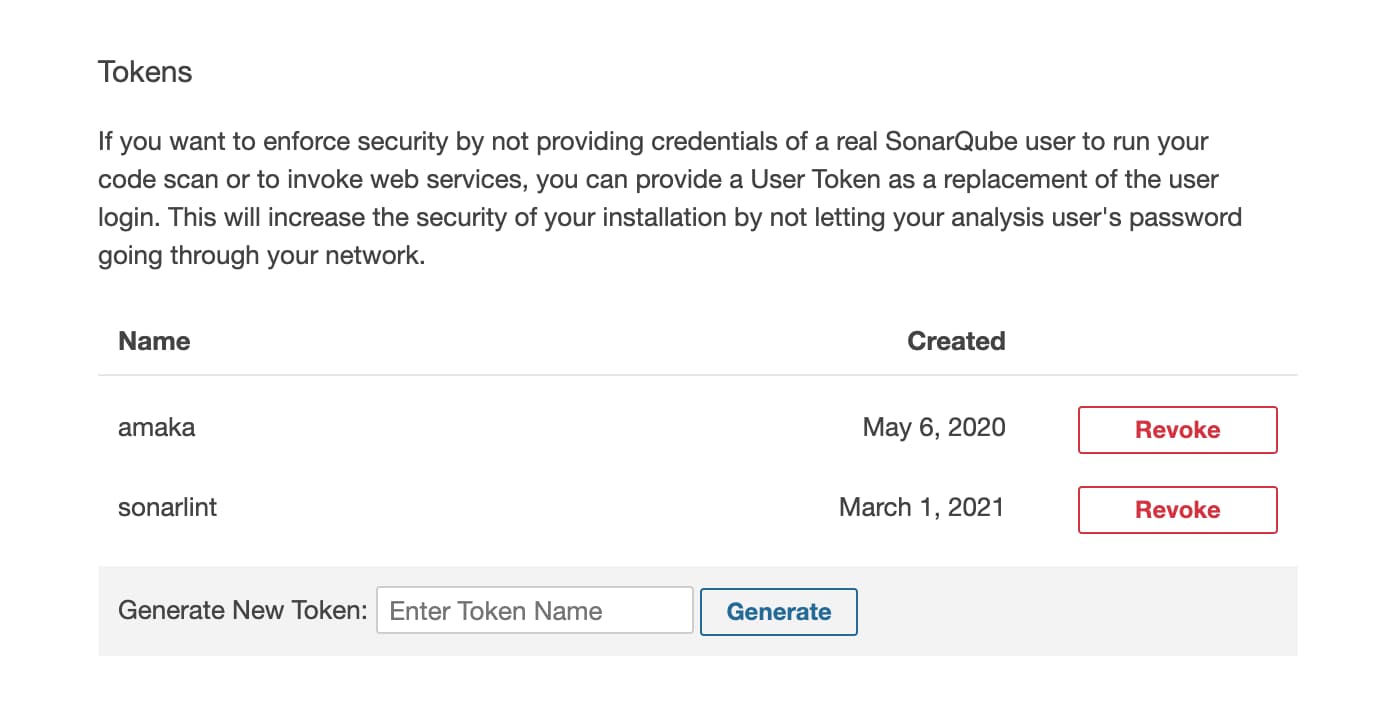
Click on the Security tab and generate a token or use an existing token if you saved it somewhere. Copy the generated token and set it to the token in the example above.
Step 5: Obtain the Project Key
Go to the SonarQube server, click on the Projects tab and find the project you need to configure. The key is usually in the URL e.g. https://sonar.domain.com/dashboard?id=my-project-key. It is also located at the bottom-right corner of the page. Copy the key. Now, you'll configure the project binding and set the copied project key to projectKey in the object.
Step 6: Configure the Project Binding
Configure the project binding in Sonarlint › Connected Mode: Project. This binds the current workspace folder to a SonarQube project. Binding a workspace folder to a project allows you to use the same code analyzers, rules and configuration that are defined in the server, as well as issue suppressions.
To achieve this, create a folder named .vscode within the root directory of your application and add a file named settings.json within the .vscode folder. Changes made in this file are local. So, it will affect only the current folder.
Add your configuration to the workspace settings. Ensure you enclose the snippet with curly braces.
Example:
{
  "sonarlint.connectedMode.project": {
    "projectKey": "my-project-key"
  }
}
Conclusion
Identifying SonarQube issues locally is hard. But, configuring it locally, helps you to identify the issues easily. I hope this helps you and your team.